http://mmanoba.wordpress.com/2011/08/29/howto-capture-record-live-streaming-audio-on-mac-os-x/
Howto: Capture/Record live streaming audio on Mac OS X (Leopard, Snow Leopard, Lion)
Download and install the excellent Open-Source Audio Editing tool Audacity.
If required and you wish to export the captured/recorded audio stream to MP3 file format,
Download and install LAME MP3 Encoder as well. Or get it directly from here. Once installed,
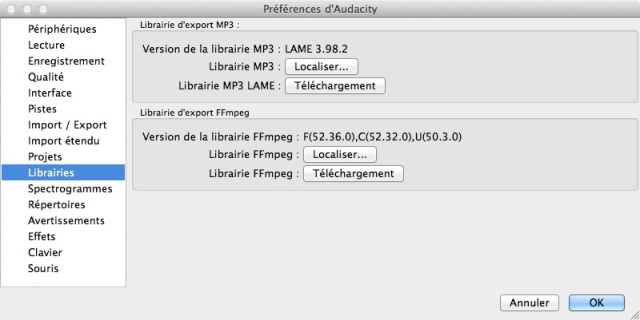
go to Audacity -> Preferences -> Libraries and verify whether it’s properly located.
If not click on the «Locate» button to locate it.
Or go to Audacity -> Preferences -> Libraries and click on «Download» button
and follow it from thereon.
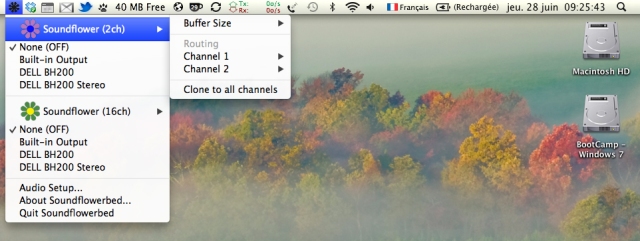
Start Soundflower (Soundflowerbed) and if required, complete the initial configuration.
Soundflowericon will now be sitting on the Task Bar.

 S
SSoundflower has two modes: 1) Soundflower (2ch) – two channel and 2) Soundflower (16ch)
– 16 channel along with other configured Audio Input/Output peripherals. While Mac’s Internal
Speakerhas 0 Inputs/2 Outputs and Internal Mic has 2 Inputs/0 Outputs, Soundflower (2ch) has
2 Inputs/2 Outputs and Soundflower (16ch) has 16 Inputs/16 Outputs.
Now to capture/record live streaming audios:
 G
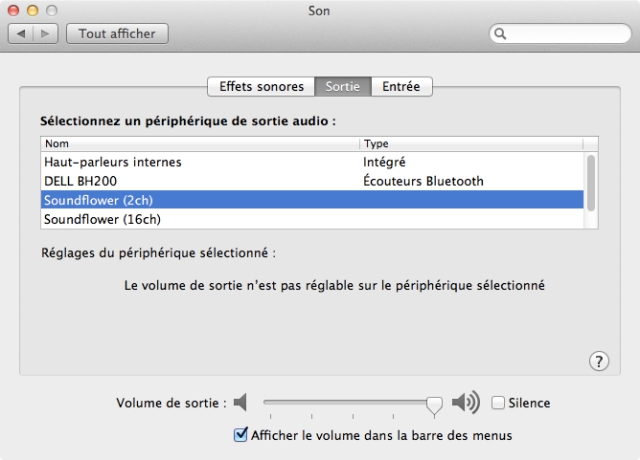
GGo to System Preferences, -> System Preferences -> Sound -> Output and
selectSoundflower (2ch) as Output.
Under Sound Effects, disable all sound effects so that they will not interfere and spoil a
clean recording process.
Now launch Audacity.
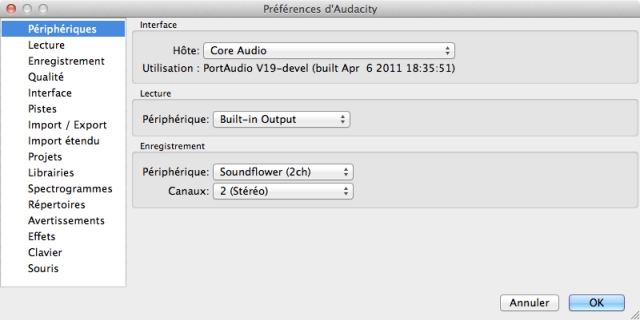
Either go to Audacity -> Preferences -> Audio I/O, and under Recording, change the
Device to Soundflower (2ch). Leave the Output Device as Built-in Output, so that you can
monitor the recording process.Or change the settings directly in Audacity itself.

 N
NNow, you can easily record any audio streamed through internet with great quality.
First start the Audacity Recording by clicking on Record button. Then start any internet or
other live stream audio (which you have already readied for playback) so that recording
goes correctly. Later, you can edit the recorded sound, add effects or make any other audio
manipulation that can be done using Audacity.
Once recording is done and stopped, go to File -> Export, select your favorite format
like mp3, wav,aiff, etc. and click on Save. It will open another window for Tag Editting.
Fill it if required or just proceed with exporting. Voilà, now you have recorded and exported
a live streaming audio with same quality as streamed using Soundflower and Audacity.
Don’t forget to change the audio settings back to normal after recording your favorite
audio streaming. And please respect Copyright rules.
Edited later:
A) Soundflower works great with QuickTime 7.x as well (Mine is “Pro”. I’m not sure about
“Non Pro”). But no luck with QuickTime 10.x.
B) To listen to playback while recording, do the following:
Launch Soundflower. From menu, under Soundflower (2ch), select “Built-in Output”
(pervious one would be “None (OFF)“).
Open System Preferences. Under Sound, set Soundflower (2ch) as both Output and Input.
Now open Audacity. Set Soundflower (2ch) as “Recording Device” and 2 (Stereo) as
“Recording Channels”. Leave Built-in Output as “Playback device”.